

A construction snag list is a structured record of incomplete, damaged or unacceptable work that must be corrected before an area or project can be accepted.
Depending on where you work, you may hear it called a snag list, punch list, defects list, outstanding works list or completion list. The terminology varies, but the objective is the same: identify what is wrong, assign responsibility and verify that every item has been corrected properly.
Snagging may sound simple. You walk around the project, find defects and write them down.
On a real construction project, however, an uncontrolled snagging process can quickly produce thousands of poorly described items, repeated inspections, arguments about responsibility and delays to handover.
A good snag list does more than record defects. It creates an auditable workflow from identification to verified closure.
This guide explains how construction snagging should be planned, conducted and controlled, with practical examples and a snag list template you can adapt for your own projects.
What is a snag list in construction?
A construction snag list is an itemised list of work that is incomplete, defective, damaged or otherwise not ready for acceptance.
Typical snagging items include:
- Incomplete finishes
- Damaged components
- Poor workmanship
- Missing fixtures or fittings
- Incorrect installation
- Materials that require cleaning
- Equipment labels that have not been installed
- Doors or windows that do not operate correctly
- Unsealed penetrations
- Missing test records
- Incomplete commissioning activities
- Work that does not match the approved drawings
Each snag should identify what needs to be corrected, where it is located, who is responsible and when it should be completed.
A snag list is therefore not simply a collection of photographs. It is a controlled action list.
What is the difference between a snag list and a punch list?
In most situations, there is no significant technical difference between a snag list and a punch list.
“Snag list” is commonly used in the United Kingdom, Ireland, Australia and many Middle Eastern construction markets. “Punch list” is more commonly used in the United States and Canada.
Both terms generally describe a list of incomplete or unacceptable items that must be corrected before completion or handover.
Some organisations use “punch list” for the main contractor’s internal inspection and “snag list” for the consultant or client’s findings. This can be useful as an internal convention, but it is not a universal industry definition.
The project’s procedures and contract documents should make the intended terminology clear.
Snag versus defect versus nonconformities
Snags, defects and nonconformances are closely related, but they should not always be treated as the same thing.
Snag
A snag is usually a minor incomplete, damaged or unacceptable item that can be corrected without a detailed technical investigation.
Examples include:
- Paint requiring a final touch-up
- A missing doorstop
- Damaged ceiling tiles
- An incomplete sealant joint
- Labels missing from an electrical panel
- Construction debris remaining inside a room
Defect
A defect is work or a component that does not provide the required finish, function or performance.
Examples include:
- A leaking pipe joint
- Cracked floor finishes
- A fire door that does not close correctly
- Incorrectly aligned cladding panels
- An air-conditioning unit that does not achieve the required performance
A defect may still be recorded on a snag list, particularly during completion and handover.
Nonconformance
A nonconformance is a failure to meet a specified requirement. It may require formal technical review, correction, root-cause analysis or corrective action.
Examples include:
- Concrete failing to achieve its specified strength
- Installation of an unapproved material
- Structural work that does not follow the approved drawing
- Failure to perform a mandatory inspection or test
- Work completed without an approved method statement
- Welding that fails the specified acceptance criteria
A snagging system should not be used to hide significant nonconformances. These should be escalated through the project’s formal construction NCR process.
The project should define when a snag must become an NCR.
When should construction snagging begin?
Snagging should not begin only a few days before handover.
If the project waits until the end, the team may discover hundreds or thousands of defects when access is limited, subcontractors have left the site and completed finishes are vulnerable to damage during corrective work.
Effective snagging takes place throughout construction.
Progressive snagging
Progressive snagging is performed while work is being completed. Supervisors and quality personnel identify defects early, while the responsible workforce and equipment are still available.
For example, a floor can be inspected before ceiling closure, decoration or final cleaning. The subcontractor can then correct the work before subsequent activities make access more difficult.
Trade completion inspections
When a subcontractor completes a defined area or package, it should conduct its own inspection before offering the work to the main contractor.
This is sometimes described as self-inspection or subcontractor pre-snagging.
Main contractor inspection
The main contractor should inspect the work before requesting a formal consultant or client inspection. Presenting visibly incomplete work wastes everyone’s time and damages confidence in the contractor’s quality controls.
Consultant or client inspection
Once the contractor considers the area ready, the consultant or client may conduct a formal inspection and issue its own comments.
Final pre-handover inspection
A final inspection confirms that previous items have been closed and identifies any remaining defects, cleaning requirements or documentation gaps.
The objective should be to arrive at handover with a short, controlled list—not to begin snagging for the first time.
Who is responsible for preparing the snag list?
Responsibility depends on the contract, project procedures and stage of inspection.
Several parties may prepare their own lists.
Subcontractor
The subcontractor should inspect its own work and correct obvious defects before requesting acceptance.
Its responsibilities normally include:
- Completing self-inspections
- Identifying incomplete work
- Correcting defects promptly
- Providing evidence of completion
- Protecting completed work
- Attending reinspection when required
Main contractor
The main contractor coordinates the overall snagging process and should ensure that work is genuinely ready before presenting it to the consultant or client.
Its responsibilities may include:
- Establishing the snagging procedure
- Defining inspection zones and sequences
- Reviewing subcontractor self-inspections
- Conducting internal snag walks
- Allocating items to responsible subcontractors
- Monitoring target dates
- Verifying corrective work
- Reporting progress to the project team
- Preventing damage to completed work
Consultant or architect
The consultant or architect may inspect the work against the drawings, specifications, approved materials and expected standard of workmanship.
Its responsibilities may include:
- Identifying unacceptable or incomplete work
- Describing requirements clearly
- Avoiding subjective or ambiguous comments
- Reviewing proposed remedial actions when necessary
- Reinspecting completed items
- Confirming acceptance or rejection
Client or owner
The client may participate in pre-handover inspections and identify issues affecting appearance, operation, maintenance or contractual requirements.
The client should avoid using the snagging process to introduce new scope that was not included in the contract. A request for additional or changed work may need to be managed as a variation rather than a snag.
Project quality team
The quality team may administer the system, monitor performance and ensure significant issues are escalated appropriately.
However, quality personnel should not become responsible for correcting everyone else’s work. Responsibility remains with the organisation or trade that performed the work.
The construction snagging process
A reliable construction snagging process can be divided into nine stages.
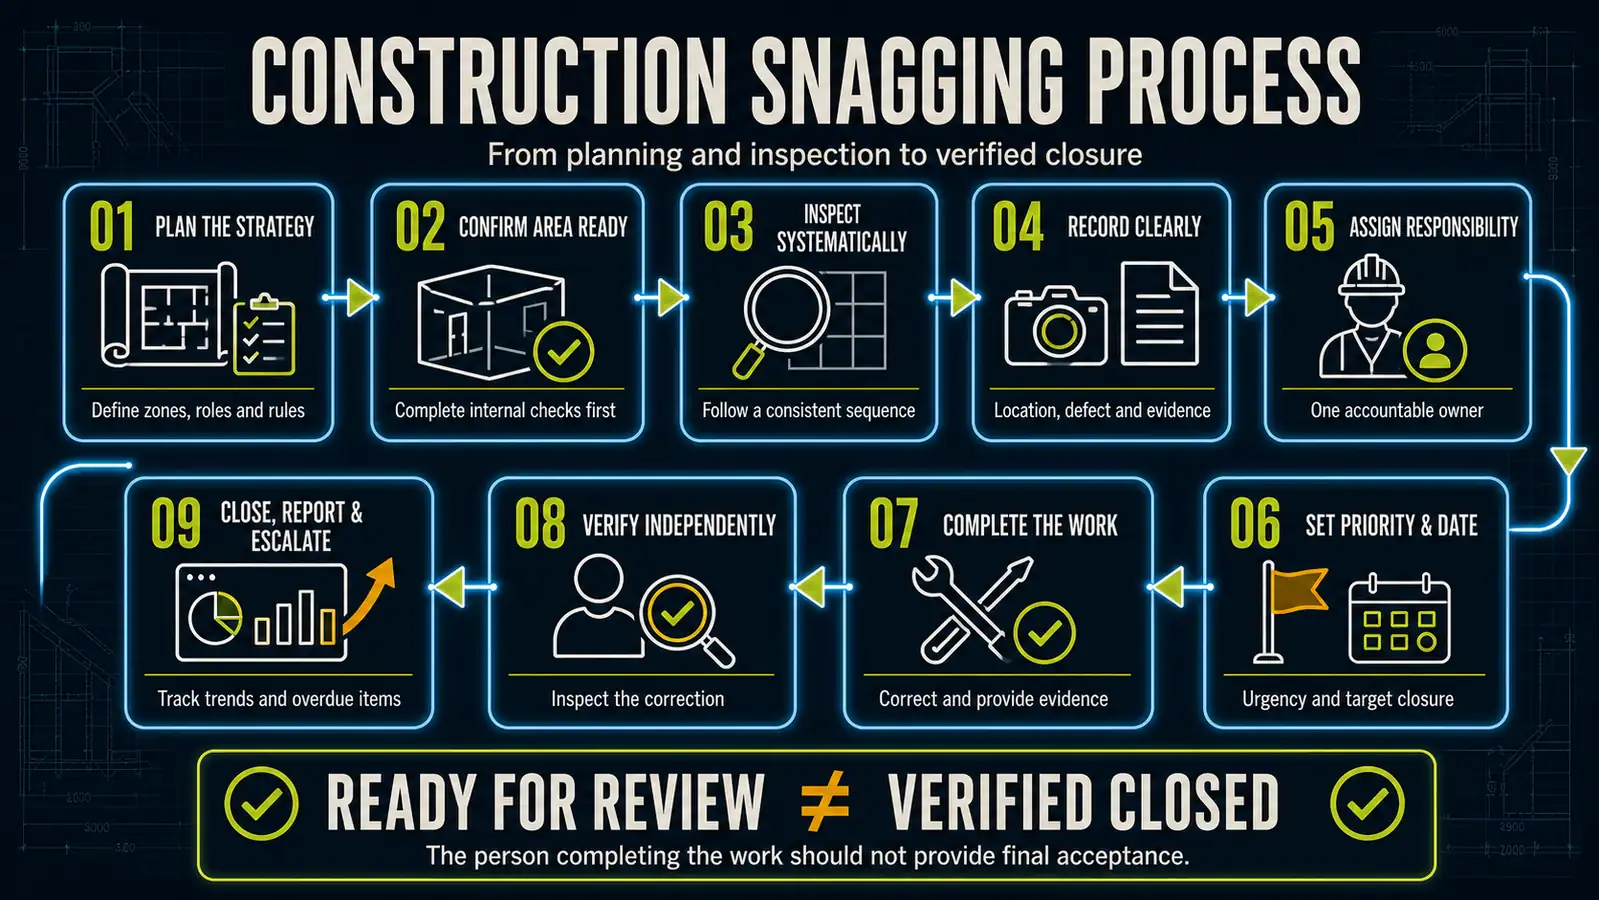
1. Plan the snagging strategy
Before inspections begin, divide the project into manageable areas.
These may be organised by:
- Building
- Floor
- Zone
- Room
- System
- Discipline
- Subcontract package
- Handover phase
Define who will inspect each area, who can raise items, who can assign them and who has authority to close them.
The process should also establish:
- Snag categories
- Priority levels
- Target closure periods
- Required photographs
- Status definitions
- Escalation criteria
- Reporting frequency
- Reinspection requirements
Without these rules, different inspectors will record and close items inconsistently.
2. Confirm the area is ready
Do not begin a formal snagging inspection while substantial work is still underway.
Before offering an area for inspection, confirm that:
- The relevant work is substantially complete
- Internal contractor checks have been performed
- The latest drawings are available
- Temporary protection allows proper inspection
- The area is safe and accessible
- Adequate lighting is available
- Testing has been completed where applicable
- The area has received an appropriate builders’ clean
An unfinished area will generate an unnecessarily long snag list that becomes difficult to manage.
3. Conduct the inspection systematically
Inspect the area in a consistent sequence.
For a room, this may involve:
- Entrance and door
- Walls and finishes
- Ceiling
- Floor
- Windows and glazing
- Fixtures and fittings
- Mechanical services
- Electrical services
- Fire-stopping and life-safety components
- Cleaning and protection
A systematic inspection reduces the likelihood of missing defects.
Use the applicable drawings, specifications, approved samples, manufacturer instructions and inspection records. Snagging should be based on defined requirements rather than personal preference.
4. Record each snag clearly
Every snag should communicate exactly what is wrong and what outcome is required.
A good description might say:
Room 2.14, north wall: Repair the damaged plasterboard beside electrical outlet E-07 and reinstate the approved paint finish.
A poor description would say:
Wall not good.
The first description identifies the location, defect and required action. The second invites confusion.
Where possible, include:
- Unique snag number
- Project and area
- Exact location
- Clear description
- Applicable trade
- Photograph
- Drawing reference
- Priority
- Responsible organisation
- Date raised
- Target date
- Current status
Avoid combining several unrelated defects into one item. Each snag should be capable of being assigned, corrected and closed independently.
5. Assign responsibility
Each item should have one clearly identified responsible organisation.
Avoid assigning the same item simultaneously to several subcontractors. If responsibility is disputed, the main contractor should review the drawings, scope and site conditions and make a decision.
The snag should not remain unassigned while different parties argue through email.
When one defect affects several trades, either assign a coordinating owner or create separate linked actions for each responsible party.
6. Set priorities and target dates
Not every snag carries the same level of risk.
A simple priority system may be:
Priority 1 — Critical
An issue affecting safety, structural integrity, regulatory compliance, operation or occupancy.
Examples:
- Incomplete fire-stopping
- Unsafe electrical installation
- Emergency equipment not operational
- A blocked means of escape
- Significant water ingress
Priority 2 — Major
An issue affecting function, durability, contractual compliance or handover.
Examples:
- Door hardware not functioning
- Leaking plumbing connection
- Incorrect equipment installation
- Missing commissioning record
- Damaged waterproofing
Priority 3 — Minor
An appearance, cleaning or minor completion issue that does not prevent safe use.
Examples:
- Paint touch-up
- Small surface mark
- Missing label
- Minor sealant defect
- Incomplete cleaning
Priority should influence the closure date, but all contractual items still require resolution.
7. Complete the corrective work
The responsible subcontractor should review the item, carry out the required work and provide evidence.
Completion evidence may include:
- An after-correction photograph
- Test result
- Inspection record
- Updated drawing
- Material certificate
- Commissioning record
- Written explanation
The subcontractor should mark the item as ready for review—not close it unilaterally.
8. Verify the correction
Verification should be performed by an authorised person who can confirm that the required result has been achieved.
The verifier should check:
- The correct item and location
- The quality of the remedial work
- Whether adjacent finishes were damaged
- Whether required testing was completed
- Whether the original requirement is now satisfied
- Whether supporting records are complete
If the correction is unacceptable, the item should be reopened or returned with a clear explanation.
“Completed by subcontractor” and “verified closed” must remain separate statuses.
9. Report and escalate overdue items
The project team should regularly review:
- Total open items
- Overdue items
- Critical items
- Items awaiting verification
- Reopened items
- Snags by subcontractor
- Snags by area
- Average closure time
- Recurring defect categories
Repeated or significant failures may need escalation through the NCR or corrective-action process. My guide on closing NCRs in construction explains why evidence and independent verification are essential.
What information should a construction snag list contain?
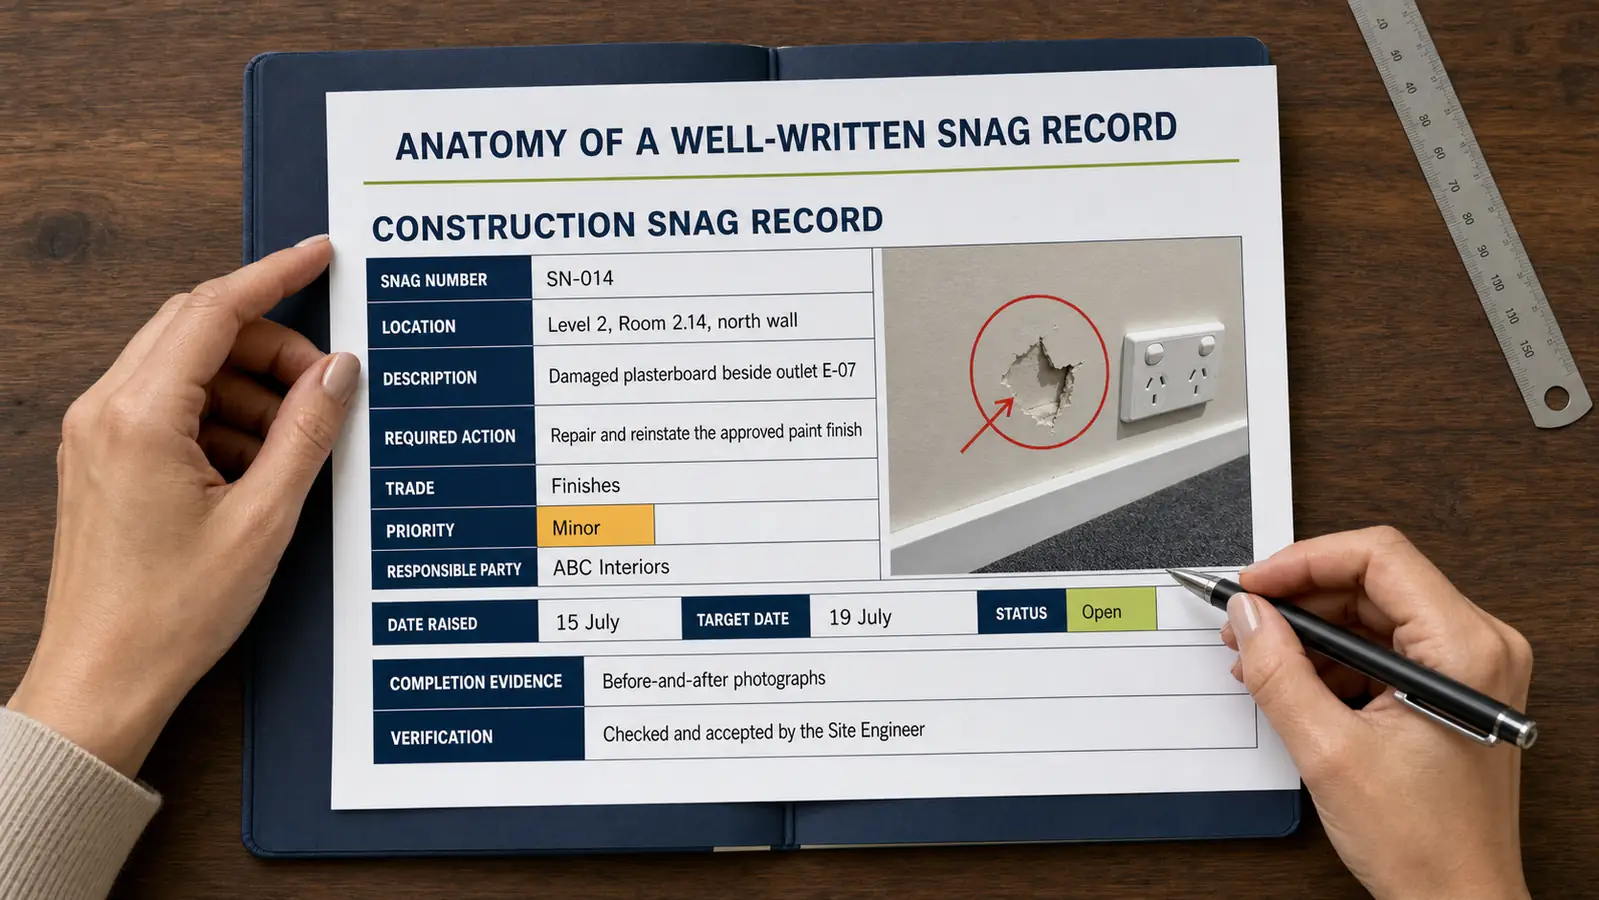
A practical snag list should contain the following fields:
| Field | Purpose |
|---|---|
| Snag number | Provides a unique reference |
| Project | Identifies the applicable project |
| Building or zone | Narrows the general location |
| Floor or level | Identifies the relevant level |
| Room or exact location | Allows the item to be found |
| Date raised | Records when the defect was identified |
| Raised by | Identifies the inspector |
| Description | Explains the problem and required outcome |
| Category or trade | Groups the item for reporting |
| Drawing reference | Links the item to the applicable requirement |
| Photograph | Provides visual evidence |
| Priority | Indicates urgency and significance |
| Responsible party | Identifies who must act |
| Target date | Establishes the expected completion date |
| Status | Shows the item’s current stage |
| Completion evidence | Demonstrates what was corrected |
| Completion date | Records when the work was reported complete |
| Verified by | Identifies the independent reviewer |
| Closure date | Records final acceptance |
| Comments | Retains relevant communication |
Avoid collecting information that nobody will use. The form should be detailed enough to control the process but simple enough to complete efficiently on site.
Construction snag list examples
The following examples show the types of issues that may appear on a construction snag list.
Architectural and finishing snags
- Scratched glazing
- Damaged tiles
- Uneven paint finish
- Visible plaster repairs
- Incomplete sealant
- Misaligned ceiling tiles
- Stained carpets
- Missing skirting
- Poorly fitted ironmongery
- Incorrect door signage
- Damaged worktops
- Unfinished expansion-joint covers
Doors and windows
- Door does not close or latch correctly
- Incorrect door closer adjustment
- Missing doorstop
- Damaged frame
- Excessive clearance around a fire door
- Window does not open correctly
- Scratched glazing
- Missing restrictor
- Sealant incomplete around the frame
- Hardware does not match the approved schedule
Mechanical snags
- Pipework leaking
- Equipment labels missing
- Valve inaccessible
- Insulation incomplete
- Ductwork damaged
- Flexible connection incorrectly installed
- Access panel missing
- Grille not aligned
- Commissioning result not available
- Condensate drainage incomplete
Electrical snags
- Socket or switch damaged
- Circuit label missing
- Distribution board schedule incomplete
- Light fitting not operational
- Cable penetration not sealed
- Emergency lighting test outstanding
- Access to equipment obstructed
- Incorrect faceplate installed
- Exposed or unsupported cable
- Panel door not closing correctly
Fire-stopping and life-safety snags
- Penetration not fire-stopped
- Fire-stopping label missing
- Fire door not self-closing
- Smoke seal damaged
- Fire alarm device obstructed
- Emergency exit sign missing
- Escape route obstructed
- Fire extinguisher not installed
- Test certificate outstanding
Fire and life-safety items should normally receive high priority and may require formal inspection records rather than a simple photograph.
External works snags
- Damaged paving
- Ponding water
- Incorrect falls
- Incomplete road markings
- Loose kerb
- Landscaping incomplete
- Drain cover damaged
- Sealant missing
- External lighting not operational
- Construction materials not removed
Documentation and handover snags
Not every snag is a physical defect. Handover may also be delayed by missing information.
Examples include:
- As-built drawing not submitted
- Operation and maintenance manual incomplete
- Warranty missing
- Test certificate outstanding
- Training not completed
- Spare parts not handed over
- Asset information incomplete
- Commissioning record not approved
- Inspection record missing
- Equipment label not matched to the asset register
These should be tracked clearly rather than hidden among physical finishing defects.
Construction snag list template
The following simple template can be copied into Excel or your project-management system.
| Snag No. | Area/Room | Description | Trade | Priority | Responsible Party | Date Raised | Target Date | Status | Completion Evidence | Verified By | Closure Date |
|---|---|---|---|---|---|---|---|---|---|---|---|
| SN-001 | Level 2, Room 2.14 | Repair damaged plasterboard beside outlet E-07 and reinstate approved paint finish | Finishes | Minor | ABC Interiors | 15 July | 19 July | Open | |||
| SN-002 | Level 1, Fire Lobby | Fire door does not self-close from approximately 30 degrees | Doors | Critical | Door Contractor | 15 July | 16 July | In progress | |||
| SN-003 | Roof Plant Room | Reinstate insulation around chilled-water valve CHV-12 | Mechanical | Major | MEP Contractor | 15 July | 18 July | Ready for review | Photograph uploaded | Site Engineer | |
| SN-004 | Ground Floor Corridor | Replace cracked floor tile adjacent to Grid C4 | Tiling | Minor | Tiling Contractor | 15 July | 20 July | Closed | Tile replaced and area cleaned | QA Engineer | 20 July |
Recommended status values are:
- Open
- Assigned
- In progress
- Ready for review
- Rejected or reopened
- Closed
- Cancelled
Avoid using vague statuses such as “ongoing” or “almost complete”.
How to prevent a huge snag list at handover
The best snagging process is not the one that records the most defects. It is the one that prevents defects from surviving until handover.
Use Inspection and Test Plans
An effective Inspection and Test Plan identifies inspections, tests, acceptance criteria and responsibilities before work begins.
Snagging does not replace an ITP. The ITP controls the work during installation; snagging confirms that the finished area is complete and acceptable.
Inspect progressively
Inspect concealed and completed work at appropriate stages. Do not wait until ceilings are closed, access is removed or finishes cover earlier work.
Use approved samples and mock-ups
Approved samples establish the expected finish and reduce subjective disagreements during final inspections.
Require subcontractor self-inspection
A subcontractor should not offer an area for inspection while obvious defects remain.
Protect completed work
Many handover snags are caused after the original work was completed correctly. Define responsibility for protection, access and reinstatement.
Analyse recurring defects
If the same snag appears repeatedly, issuing more snag numbers is not enough. Investigate why it continues to occur.
Recurring issues may indicate:
- Inadequate supervision
- Poor workforce competence
- Unclear drawings
- Unsuitable materials
- Incorrect sequencing
- Ineffective protection
- Weak inspection controls
This is where snagging data becomes valuable quality information.
Useful construction snagging KPIs
Snagging performance can be monitored using several practical indicators.
Number of open snags
This provides a basic indication of outstanding work but should be considered alongside the amount of work completed.
Overdue snag percentage
Divide the number of overdue items by the total number of open items.
Average closure time
Measure the average number of days between raising and verified closure.
First-time closure acceptance
Measure how many completed items pass verification without being reopened.
Snags per area or unit
This can help compare similar floors, rooms, apartments or work packages.
Snags by trade
This identifies where additional supervision, training or process improvement may be necessary.
Recurring snag categories
Repeated defect types provide stronger improvement opportunities than isolated incidents.
These can be incorporated into the project’s wider construction quality metrics.
Should you use a snagging app?
A digital snagging app can make the process significantly easier, particularly on a large project.
Useful functions include:
- Pinning items to drawings
- Adding before-and-after photographs
- Assigning items instantly
- Automatic notifications
- Offline mobile access
- Status tracking
- Reinspection workflows
- PDF and Excel reports
- Dashboards
- BIM integration
- Complete activity history
However, software cannot compensate for a poorly defined process.
Before choosing a platform, define your responsibilities, status workflow, priority system, closure authority and reporting requirements. You can then compare suitable products in my guide to the best construction snagging apps and software.
Common snagging mistakes
Beginning too late
Leaving snagging until the final weeks creates excessive pressure and increases the risk of delayed handover.
Recording vague descriptions
Descriptions such as “finish bad” or “repair wall” do not explain the requirement clearly enough.
Raising duplicate items
Multiple inspectors may record the same problem. Agree on inspection zones and check existing items before creating a new one.
Combining several defects into one item
Each snag should be independently assignable and closable.
Closing items without verification
The person who performs the correction should not normally provide the final acceptance.
Using snagging instead of formal quality control
Snagging cannot replace material approvals, method statements, ITP inspections, testing or NCR control.
Treating additional scope as a snag
If the client requests something outside the agreed requirements, it may be a change—not a defect.
Ignoring recurring problems
Repeatedly closing the same type of defect without investigating the cause wastes time and money.
Frequently asked questions
What does snagging mean in construction?
Snagging is the process of inspecting construction work to identify incomplete, damaged, defective or unacceptable items that require correction before acceptance or handover.
Who prepares the construction snag list?
The subcontractor, main contractor, consultant, architect or client may prepare a snag list. On a well-managed project, the subcontractor and main contractor inspect the work before it is formally presented to the consultant or client.
When should a snag list be prepared?
Snagging should take place progressively throughout construction, at trade completion and again before handover. It should not be postponed until the final days of the project.
What should be included in a snag list?
Each item should include a unique reference, exact location, clear description, photograph, responsible party, priority, target date, status, completion evidence and verified closure.
Is a snag the same as an NCR?
Not always. A minor finishing or completion item may be managed as a snag. A significant failure to meet a drawing, specification, procedure or acceptance criterion may require a formal NCR.
Can the subcontractor close its own snag?
The subcontractor can mark the item as completed or ready for review. Final closure should normally be performed by an authorised verifier after checking the corrective work.
What is a zero-snag handover?
A zero-snag handover aims to deliver the project without outstanding defects. In practice, this requires progressive inspection, strong trade supervision, protection of completed work and early closure—not simply a final inspection with no comments.
How long should contractors have to close snags?
The closure period should reflect the item’s priority, complexity, access requirements and contractual programme. Safety-critical or handover-blocking issues should be addressed immediately, while minor finishing items may have an agreed short completion period.
Conclusion
A construction snag list should provide a controlled route from identifying an unacceptable item to confirming that it has been corrected properly.
The process works best when snagging begins early, areas are inspected systematically and every item has a precise location, clear description, responsible party and target date.
Most importantly, reported completion should not be confused with verified closure.
Snagging also needs to sit within the wider construction quality-management system. Inspection and Test Plans should control work as it progresses, audits should evaluate whether the process is being followed, and significant failures should be escalated through the NCR and corrective-action process.
When these controls work together, the final snag list becomes shorter, handover becomes smoother and the project gains useful data for preventing the same defects from appearing again.